canva
Introduction to the Canva Interface

Published by
The Nonprofit Template Shop
Posted on
April 22, 2022
Updated on November 29, 2022
One of the things we love most about Canva is the rate at which the developers innovate, bringing all of us amazing new or improved features and functions.
That said, that innovation can make it difficult for those of us who use the application to keep up with all of the changes. Though we do our best to keep abreast of those changes, you may notice that some elements of the content below appear slightly different from the view you see in your Canva account. If you need any help following any of the steps you see here, please reach out to us! We’re always happy to support you.
Canva is a simple-to-use free tool that allows you to create professional-looking documents and designs for your organization. There are many reasons that we love Canva, but one of the main reasons is its ease of use. We know that getting started with new software or app can be intimidating, so in this post, we’re taking you on a tour of the Canva interface so that you can get started quickly!
This is by no means an exhaustive list of Canva features, but we’ve aimed to cover all of the basics so that you can feel more confident navigating the Canva interface.
Canva Dashboard Interface
When you first log into Canva, you’ll land on your personal dashboard, similar to the one below. There may be slight differences depending on what version of Canva (Canva Free, Canva Pro, or Canva Teams) you’re using and whether you are using the desktop app, web browser, tablet, or phone.
To help you become more familiar with the Canva interface, we’ve flagged some of the most essential icons that will help you move around within Canva.

Starting on the top left, you’ll see the ‘Home’ icon. If you ever want to get back to your main dashboard, click the ‘Home’ icon. Next, just below that, you’ll see the ‘Menu’ toggle (a hamburger menu icon). This allows you to show or hide the menu on the left-hand side.
Main Menu
The menu will help you navigate your documents and files in Canva. The headings are fairly self-explanatory, so we’ll just briefly go over them.
- Recent designs’ allows you to quickly reopen or edit a design that you were recently working on.
- ‘Your projects’ houses all of your documents, designs, and images – basically anything that you’ve created with Canva. You can also organize your designs into folders, which can be found here.
- To access documents or templates that have been shared with you, click ‘Shared with you.’
- You can recover any recently or accidentally deleted files by clicking the Trash icon. Files in the Trash folder are stored for 30 days.
- The bottom section of the menu will show any teams that you are a part of, as well as any tools that you have access to, such as your organization’s ‘Brand Kit’ and ‘Content Planner.’
Canva Dashboard
If we move toward the center section of your Canva dashboard, you’ll typically see a variety of shortcuts to files and templates. This will vary depending on how often you use Canva and what kind of documents you create. Canva will recommend templates based on past use, and it will also show you recently opened files so that you can quickly continue working on whatever you previously had open.
Account Settings
Your account settings and preferences can be found by clicking the ‘Account settings’ icon — it looks like a gear icon — in the top right corner. There, you’ll be able to update your account details, passwords and security settings, interface preferences, team/user details, and permissions, as well as billing and payment information.
Help
In the top right corner, you’ll also see the ‘Help’ icon — a question mark. This will bring you to Canva’s support database where you’ll find articles and answers to FAQs, as well as troubleshooting guides. You’ll also find ‘Design School,’ a series of tutorials made by Canva, and contact information for the Canva team.
Canva Design Interface
Now that we’ve had a look at the main dashboard, including where to access your Canva documents, templates, and account information, let’s have a look at the design tools within Canva. To access the design interface, open an existing document or start a new one.
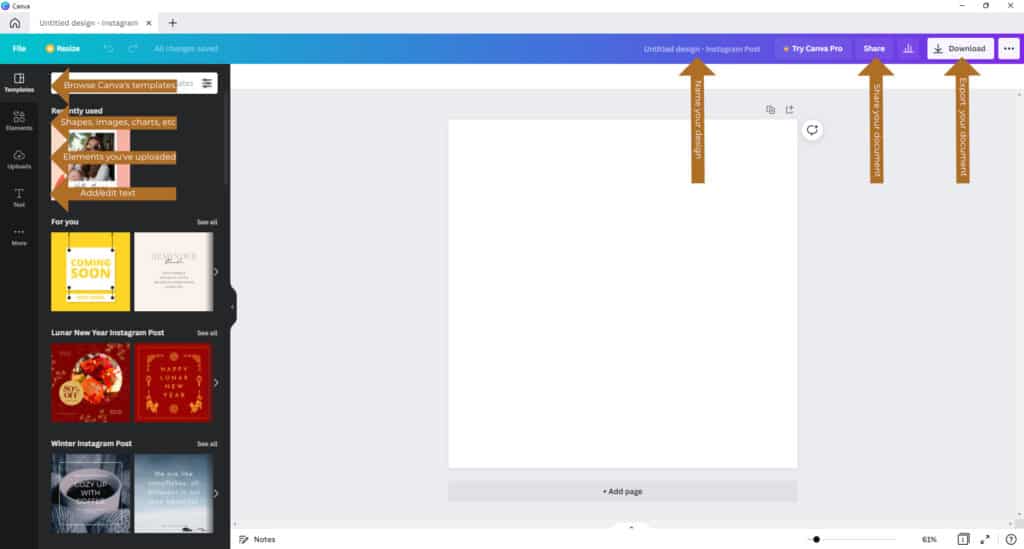
Let’s create a simple new design together in order to have a look at the design tools within Canva. In the top right corner, you’ll see a large button that says ‘Create a design.’ This is where you can create a design from scratch either using Canva’s preset sizes or a custom size.
Steps:
1. Click the ‘Create a design’ button.
2. Choose any of the options or enter a custom size by clicking the ‘+.’ In this example, we’ve chosen ‘Instagram post.’

Next, your document should open in the main Canva window similar to the example below. A new menu will appear on the left that houses design elements and options that can be applied to your document.
Across the top of the screen, you’ll also find your document name (just click within the text box to edit it), the ‘Share’ button, which will allow you to share your document with other team members or colleagues, and the ‘Download’ button which allows you to export your document in a variety of formats.
Main Design Menu
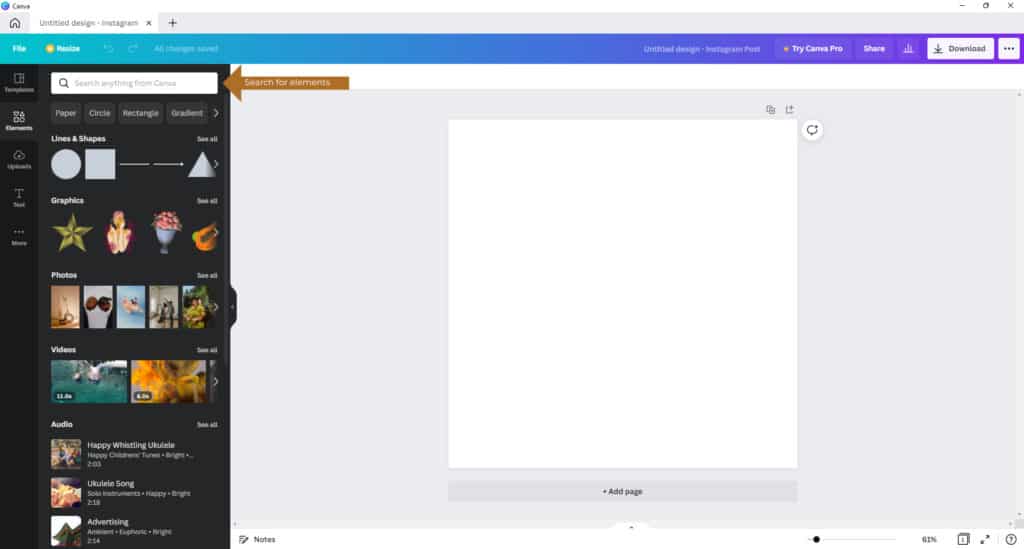
From the design menu, you’ll be able to:
- Browse through Canva’s pre-made templates; you can use the search bar to enter search terms.
- Search Canva’s library of elements, including shapes, graphics, photos, charts, tables, videos, and more.
- Add images or graphic elements that you’ve uploaded to your own library
- Add and edit text.
To access each of these design elements simply click on the menu category on the left to show the options within that element. You can then enter a search keyword into the search bar or choose from the elements that are displayed in the menu.
To add an element to your design, click on it from the slide-out menu. Once an element has been to your design you can click on it to edit it. Let’s add a square to our design as an example.
Steps:
1. Click on the category ‘Elements’ from the design menu to see a variety of shapes, graphics, photos, and videos.
Pro Tip!
You can put in any Canva Creator’s username to see the Elements they have created. Just use @nptemplateshop to see our Elements, including some of the ones used here on our website! You can also see the Elements we’ve contributed by visiting our Canva profile.
2. Click on the square shape that was displayed under ‘Lines and Shapes’ to add it to your document. If you don’t see a square, type ‘square’ in the search box.
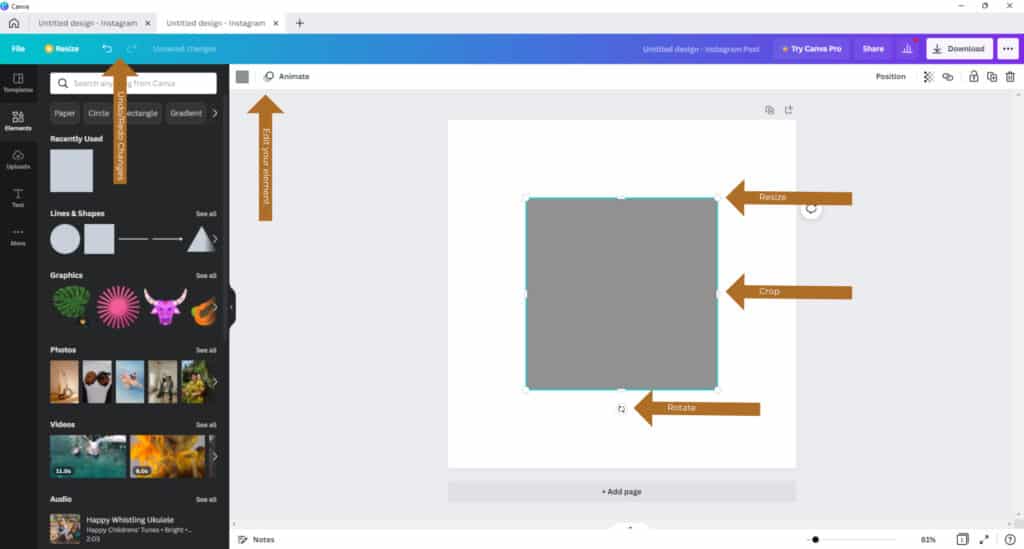
3. Finally, click on the square to select it. This will allow us to edit the square. Tip: You can tell an element is selected when it has a turquoise border.
Editing Tools
Now that your element (in our case, our square) is selected, we’ll have access to some new editing tools specific to that element. The editing tools will vary depending on what Canva has made editable with each type of element. Let’s have a look at all the ways we can edit our Square as an example.
Steps:
1. To move your square within your design, simply click and drag it on the screen. You’ll notice that when you click on hold your element, your mouse will change to a four-headed arrow, which is the move cursor.
2. To resize your square, first select it by clicking on it. This will display its handles; those are the small dots on the corners of the shape. When you hover your mouse over one of the handles, you’ll see it change to the double-headed arrow, which is the resize cursor. Drag any one of the corner handles to resize the square.
3. Similarly, you can also try cropping the square by dragging the middle handles on the top, bottom, or either side. You’ll see your mouse change to a double-headed arrow in this case as well.
4. Finally, you can rotate the square by holding and dragging the rotate handle. Your mouse will change to a double-headed curved arrow to show that you are using the rotate tool.
5. To edit the color of the square, we can access the color selection tool from the Edit bar. Again, begin by selecting your square if it’s not still selected. You’ll see new editing options appear in the white Edit bar.
6. Click the color selection icon — the small gray square — in the Edit bar to see the color menu appear in the right slide-out menu.
7. Click any color to apply it to your square.
If you make an edit and then change your mind, you can use the ‘Undo’ and ‘Redo’ buttons found in the top menu bar.
These basic editing functions work with any element in Canva. The move, resize, and rotate tools function the same way with any shape, graphic, photo, etc. The one thing that changes is the editing options available in the white Edit bar. For example, photos don’t have the same recoloring options as shapes, but they do have other photo editing tools available.
The best way to get to know Canva’s editing tools is to explore different elements, add them to your design, and play around with their editing options.
Working with Text
Working with text in Canva is also quite simple, so let’s have a look at that now.
Steps:
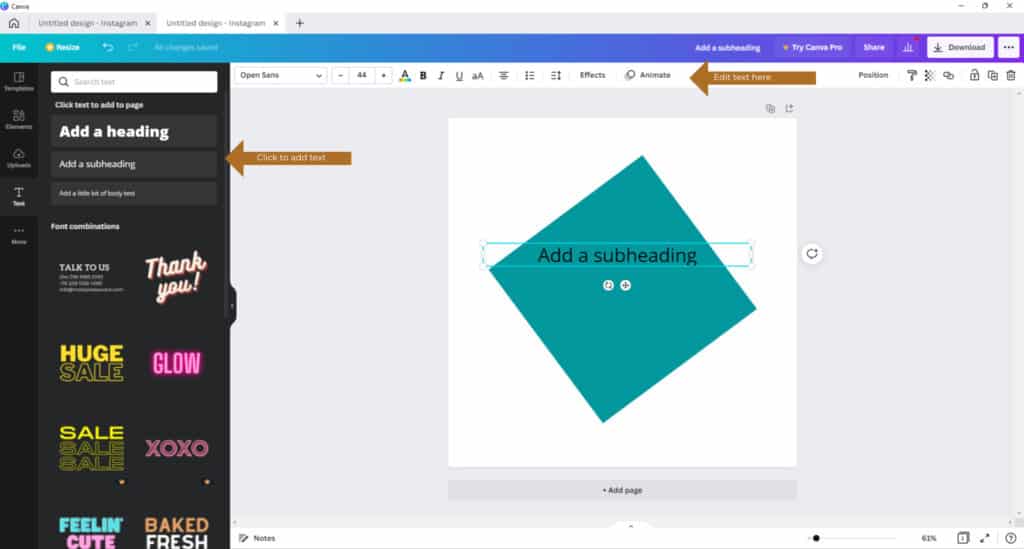
1. To begin, click on the category ‘Text’ from the main design menu. This will display the text slide-out menu.
2. Click on any of the options in the menu to add them to your design. Don’t worry if you can’t find exactly what you’re looking for; you can edit it later.
3. Once the text is added you can click it to select it just like we did with the square shape. You’ll see the same turquoise border around your text when it’s selected. The same resize, crop, and rotate tools will also be available.
4. To move the text around within your design, click and drag it into place. If the text is small and hard to grab, you can also click and drag directly on the move handle which is below the text, next to the rotate handle. This makes it easier to move small text boxes.
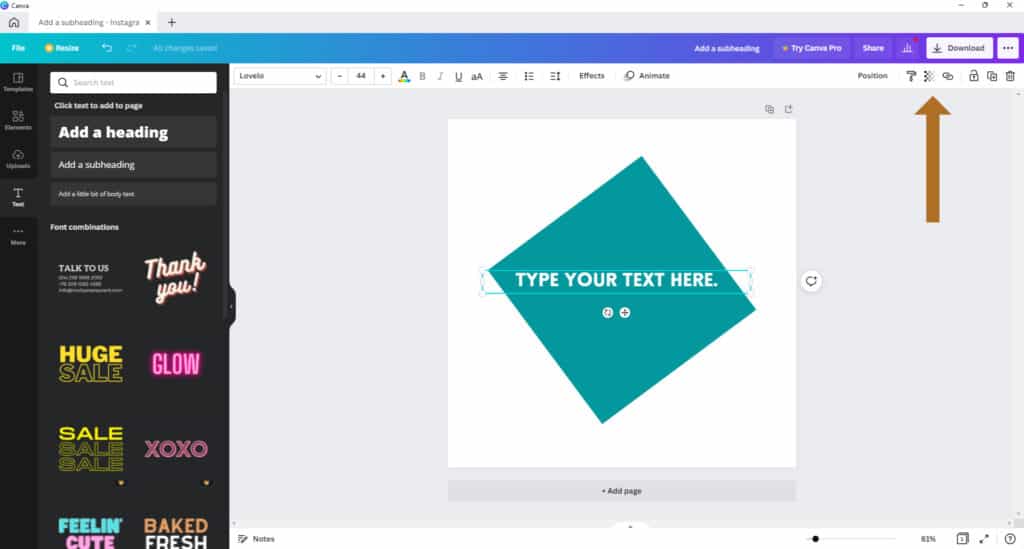
5. To edit your text, click again on your selected text box. Alternatively, you can double-click an unselected text box. Then type your text right into the text box.
6. To edit the look of the text, select the text box to see the editing tools appear in the white Edit bar. Across the top, you’ll see the options to change the font, font size, font color, font style — bold, italic, underline, case — uppercase or lowercase, and alignment. You’ll also be able to format the text as a bulleted list or numbered list. Finally, you can also apply special effects or animation to your text.
Again, the best way to get to know Canva’s text editing tools is to add some text to your design and play around with it.
Other Editing Tools
There are a few other tools we’d like to showcase that can help you with your Canva designs. You can find these tools on the top right of the white Edit bar when you have an element in your design selected. These tools will help you as you create more complex designs with multiple elements. You can see the names of the tools by hovering your mouse over them.
First, the ‘Position’ tool will help you layer your design elements. For example, if you add another shape and it covers your text, you can select it and choose ‘Backward’ from the dropdown menu to move it behind your text.
Next, the ‘Copy Style’ tool, which looks like a paint roller, allows you to copy the applied formatting of your selected element to another element. Select the element you want to copy the style of, click the ‘Copy Style’ tool — this will change your cursor to a paint roller — then click on the element you’d like to apply the style to.
The next tool is the ‘Transparency’ tool. This allows you to make an element more transparent or opaque.
The ‘Link’ tool allows you to add a link to an external website to an element in your design. This is especially useful for reports.
The ‘Lock’ tool allows you to lock an element in place so that you don’t accidentally move it. This is helpful when you have multiple elements within a design and you don’t want to accidentally move the background elements.
The ‘Duplicate’ tool will duplicate the selected element, and the ‘Delete’ tool will remove the selected element from your design.
Remember, you can always use the ‘Undo’ tool in the top left menu bar if you make a mistake!
Design Navigation
Before wrapping up, there are a few final navigational tools within the Canva design interface that will help you get around your document.
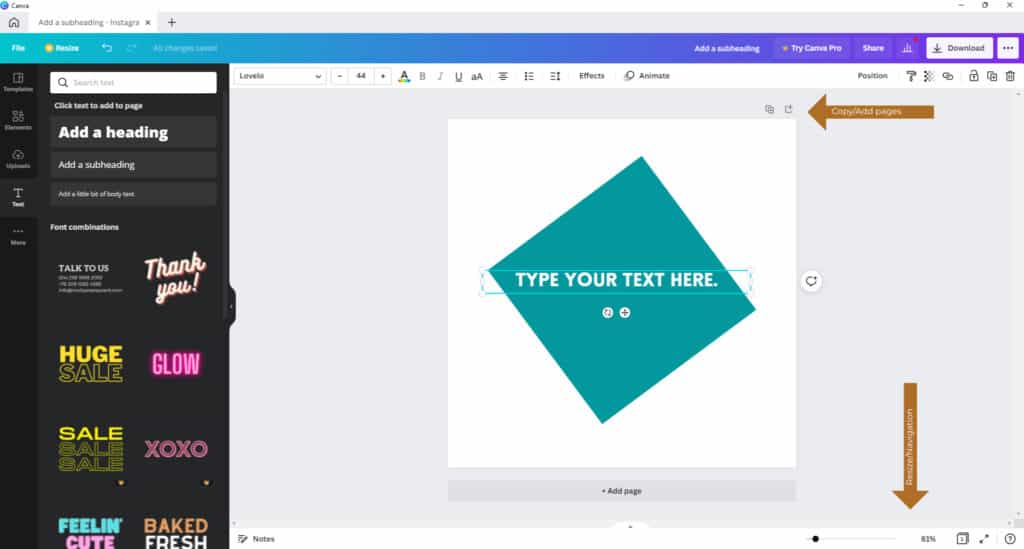
If at any point, you need to add a page to your design, you can do so using the icons just above the top right corner of your design. The ‘Duplicate Page’ icon will make a copy of your current page, while the ‘Add page’ icon will add a blank page below your current page.
Along the bottom of your design interface, you’ll see some tools that will help you navigate your design. The ‘Zoom’ tool will help you zoom in and out of your design.
The ‘Grid view’ icon will display all of the pages of your document in a grid, allowing you to rearrange, add or delete pages and then double-click back to a page to continue editing.
The ‘Present full screen’ icon will toggle presentation mode, similar to presenting a PowerPoint presentation.
Finally, the ‘Help’ icon will allow you to search Canva’s help database directly from the design interface.
We hope that this overview of the Canva interface was helpful! While there are certainly a lot of tools to become familiar with, the best way to get to know Canva is to open a new design document and play around with it. We’re confident that you’ll catch on quickly and begin to love Canva as much as we do.
